|
|
|
|
News The Project Technology RoboSpatium Contribute Subject index Download Responses Games Gadgets Contact <<< Extruder V6.1 + V6.2 Extruder V7.1 >>> Direct granules extruder V7.0The video about Direct Granules Extruder V7.0.Prints well and reliably, is easy to assemble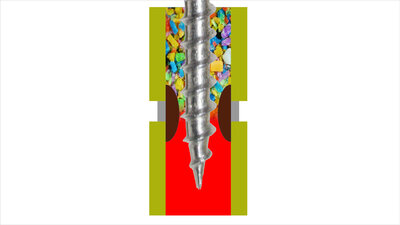
These were the specifications for version 7.0. The predecessor version, V6.2, printed well, but not consistently. Furthermore, the screw axis is tricky to adjust; the "trick" with this version was that this axis didn't have to run through the center axis of the extruder tube. The main reason for the suboptimal print quality is the problem that the liquid plastic from the hot end occasionally rises towards the cold end during printing and solidifies on the extruder wall. To prevent this, the gap between the screw and the extruder wall should be kept rather small. However, it shouldn't be too small either, since a standard wood screw with a constant pitch is used as the auger along its entire length. During the transition from solid powder to molten plastic, the trapped air must be able to escape through the gap. Since a larger screw diameter requires higher torque to extrude the plastic, and the Prusa MK4 stepper motor isn't very powerful, I reduced the bore of the extruder tube. Extruder tube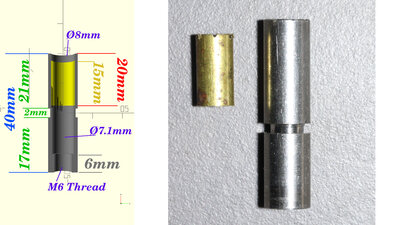
The extruder tube is based on a 40mm long M6 threaded sleeve made of stainless steel. At the top of the cold end, I use an insert made from a brass tube with an 8mm outer and 7mm inner diameter. Brass has lower static and kinetic friction than stainless steel, as I had already observed in very early versions. The high thermal conductivity of brass also ensures better cooling. 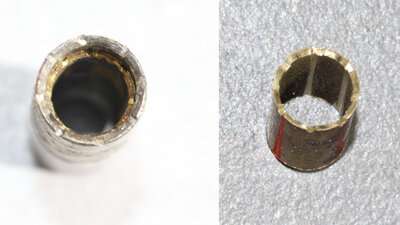
Five filed grooves along the axis in the brass tube ensure that the plastic is slowed down radially, allowing it to be transported downwards with minimal slippage. I notched the brass insert at the top so that the screw can grip the grains and press them downwards without them rotating along the edge. A drop of superglue keeps the sleeve in place - the temperature at the cold end doesn't rise above 50°C. The extruder tube is 20mm deep, drilled out to 8mm just before the constriction. The brass tube is only 15mm long, creating a step along the extruder tube. This pre-compresses the powder and forces out some of the trapped air. This step must not be too large, as the powder cannot be compressed indefinitely - at least not with the finite force available to me. Too large and the extruder will get clogged; too small and the desired effect won't be achieved. The 0.5mm wall thickness of the tube works well. I also notched the top edge of the extruder tube. Water cooling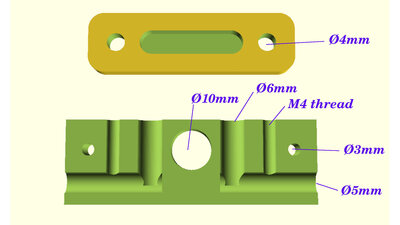
Cross section watercooling: The water cooling system has only been slightly modified and now comes without front covers. The aluminum block is drilled in such a way that the water is still routed around the extruder tube. 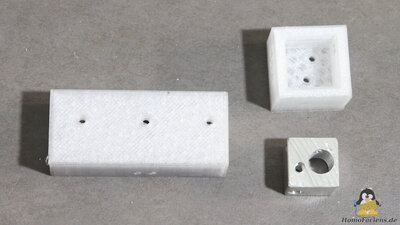
The files in the download package include 3D files for the drilling templates for water cooling and heating blocks. 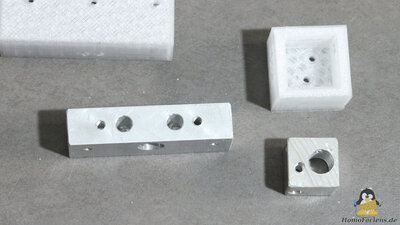
The water cooling system is based on an aluminum block measuring 60x20x15mm. The heating block measures 20x20x15mm. Assembly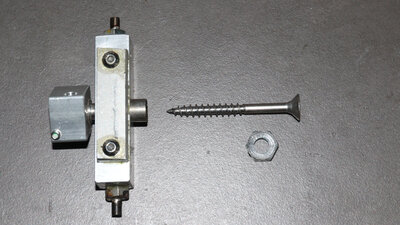
The auger is a wood screw with dimensions of 6x60mm to which an M8 nut is hard-soldered. 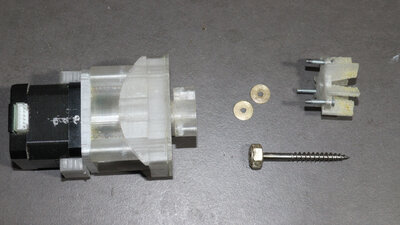
The screw is no longer floating - brass washers ensure it is firmly connected to the coupling on the gearbox. A small amount of play remains due to the ball bearing and the screw's long lever arm. The screw axis now runs through the tube's center axis - in the previous version, I had used a slight offset. At 60 mm long, the screw protrudes 31 mm into the tube. During experimentation, spacers of 3, 2, and 1 mm thickness proved helpful for varying the insertion depth. Too deep results in uneven extrusion, while too high prevents retraction, leading to severe stringing. 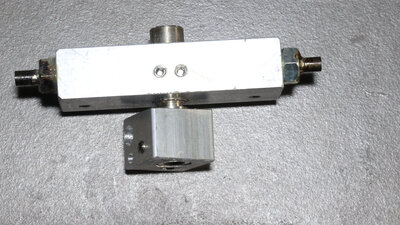
The extruder tube is inserted into the aluminum block up to the notch and secured with two screws. It protrudes 5 mm from the top of the aluminum block. Two set screws fix the tube in place. The aluminum block at the hot end, at 15mm high, does not quite reach the notch of the tube. DownloadThe 3D files and the extruder sketch are available as a download package.Print examples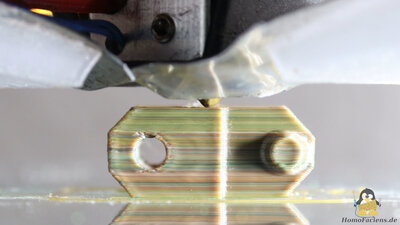
Track link Dimensions: 27x25x12mm Layer height: 0.2mm Extrusion width: 0.5mm Print speed: 80mm/s I did the first print with the newly manufactured extruder using a 0.6mm nozzle - the larger opening allows any leftover shavings from drilling and filing to pass through more easily. The print shows a slight over-extrusion. Manufacturing tolerances apparently mean that this extruder, built specifically for the video, feeds slightly more material per screw revolution than the original extruder from version 7.0, despite identical specifications. The fact that the screw transports the material with optimal grip is evident from the fact that even small variations of 5% or less in the slicer settings have a noticeable effect on the print. In previous versions, it took at least 10% or more to produce visible signs of over- or under-extrusion. The material is extruded with almost no slippage. Despite the slight over-extrusion, the first print is successful - the walls of my standard track link are nice and smooth. 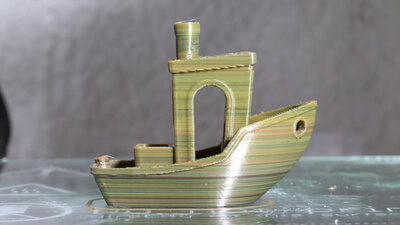
Benchy Dimensions: 180x93x144mm Layer height: 0.2mm Extrusion width: 0.5mm Print time: 56min The next print was then done with a 0.4mm nozzle and a reduced filament factor. In terms of reliability, the extruder in version 7.0 sets new standards. I've already printed a small fleet with the first version 7.0 extruder, and there are no gaps visible on any of the Benchys. The second extruder in the series has also been working perfectly from the start. Infill and perimeters are printed at significantly different speeds without any gaps appearing in the outer walls - as seen in the previous video, the predecessor version had weaknesses in this regard. Infill is set to 80mm/s, even for the top layers with 100% infill. The outer perimeters are printed at 50mm/s, and small structures even at only 30mm/s. Retract is set to a very low value with respect to my previous extruders, and there's no stringing. For the very first Benchy with a brand-new extruder, the result is quite impressive. <<< Extruder V6.1 + V6.2 Extruder V7.1 >>> News The Project Technology RoboSpatium Contribute Subject index Archives Download Responses Games Links Gadgets Contact Imprint |
|
|