|
|
|
|
News The Project Technology RoboSpatium Contribute Subject index Download Responses Games Gadgets Contact <<< Imprint ...to be continued. >>> Geeetech E180 3D printerThe Video about the Geeetech E180 3D printerGet the printer at Gearbest. Note: Even if advertised, the printer might ship without a built in filament sensor! The printer ships with only 500g of white PLA, you can get additional filament at Gearbest. Ordering Blue Tape for the print bed is also a good idea. About the printer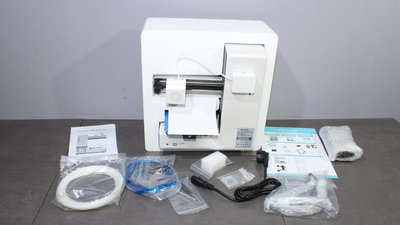
The Geeetech E180 is a very compact 3D printer. The print volume is 13x13x13cm and the device is advertised as an easy to handle printer for beginners. The print bed is not heated and the maximum temperature of the hotend is limited to 245°C by firmware - PLA is the best plastics for use with this machine. The printer ships completely assembled and the mechanics is protected by a robust plastics housing. 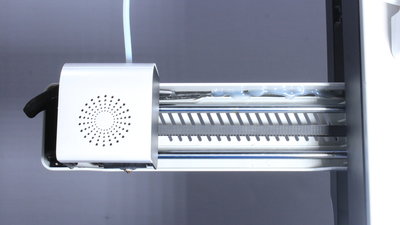
On my device I had an issue with the X axis: There was too much hotglue used to fix the cables - the print head gets stuck on a glue knob and so can't reach the end point. I removed all of that hot glue and put only a blob on the middle of the axis to keep the cable in place. 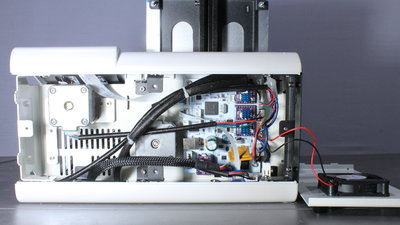
After loosening four screws on the bottom plate you can see the tidy interior of the printer. A STM32 microcontroller with a clock speed of 72MHz is used as CPU. The motor drivers are plugged on the main board so that those parts can be replaced easily in case something goes totally wrong. 
You can replace the hotend with the 0.4mm nozzle easily by unlocking the device through a tiny lever and pulling it out afterwards. Reinserting the hotend is done quickly as well. With that, a clogged nozzle is easy to fix. A spare nozzle is part of the package, because you can't source this special Geeeteck part just around your corner. My first attempt to contol the axes through the printer menu failed. Whenever I tried to move an axis, the touchscreen turned to black and the printer was rebooting. That's obviously an error in the firmware, because the motors run perfectly in all other modes. You can operate the printer without moving the axes through that function. 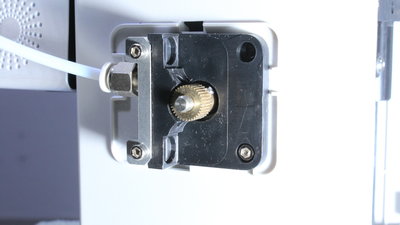
The printer is advertised with a filament sensor, however there was no such switch in my device even while it was mentioned in the the manual. Having a filament sensor would be nice - all you can do without that switch is pausing the job manually before running out of filament. Add-ons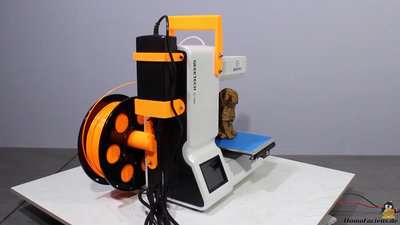
I designed and printed a filament holder, a handle and a holder for the power supply. With that you can pick up the printer with one hand. You can get the 3D files as download package. Sample prints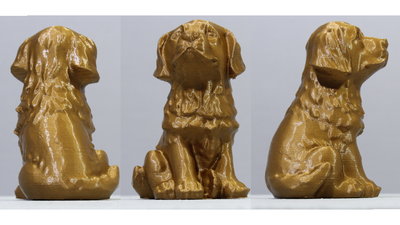
Filament: PLA Layer height: 0.2mm Druckzeit: 6 Stunden Größe: 65x80x117mm Ich bin kein Experte für Canidae, würde aber aufgrund der Farbe darauf schließen wollen, dass es sich um einen "Golden Retriver" handelt. Die Druckqualität ist gut, alle Details der Figur, die etwa 12cm hoch ist, sind gut zu erkennen. An einem der Ohren sind herunterhängende Fäden zu sehen. An dieser Stelle befindet ein extremer Überhang, der für Filamentdrucker generell ein Problem darstellt, nicht nur für den Geeetech E180. An solchen Problemstellen wird normalerweise eine Stützstruktur mitgedruckt, die anschließend entfernt wird. Die Oberfläche der Figur ist geschlossen, nirgends sind Lücken zu sehen. Ich bin mit dem Ergebnis zufrieden. 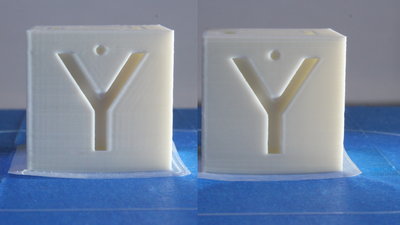
Filament: PLA Layer height: 0.2mm Print time: 1 Stunde Dimensions: 30x30x30mm The cube is used to test for vibrations along the horizontal axes. You can see wavy patterns at the edges of the Y - that unwanted effect is called "ghosting" or "ringing". The left cube was printed with 40mm/s and you can see the unwanted artefacts at the edges of the 'Y'. When lowering the print speed of the perimeters to no more than 20mm/s, as I did at the right cube, the surface is smooth. 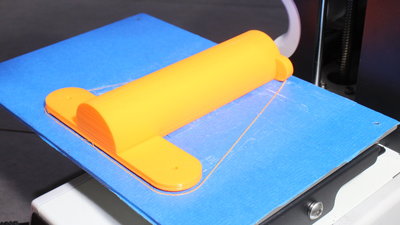
Filament: PLA Layer height: 0.2mm Print time: 5 Stunden Dimensions: 120x115x25mm Filament holder with mount points on the housing of the printer. 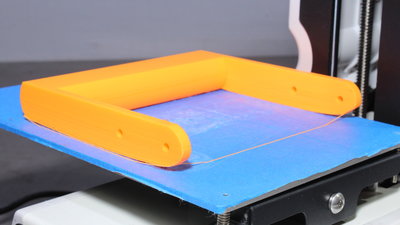
Filament: PLA Layer height: 0.2mm Print time: 3 Stunden Dimensions: 125x120x20mm The handle got loosened from the build plate while printing. That effect is called 'Warping' and becomes harder to fight the larger your prints are. With a 'Brim' you can higher the adhesion on the build plate, however I did not use that option. Even while the handle isn't dead straight because of the warping effect, it is nonetheless suitable for the printer which is why I did not do a second print. 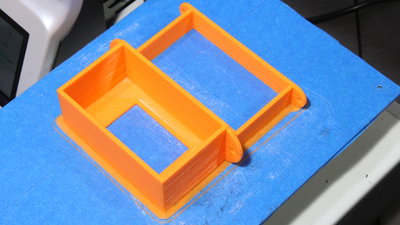
Filament: PLA Layer height: 0.2mm Print time: 2 Stunden Dimensions: 94x95x30mm You can see a bit of warping at the edges of the holders for the power supply as well, but it is negligible for the function of the parts. <<< Imprint ...to be continued. >>> News The Project Technology RoboSpatium Contribute Subject index Archives Download Responses Games Links Gadgets Contact Imprint |
|
|